
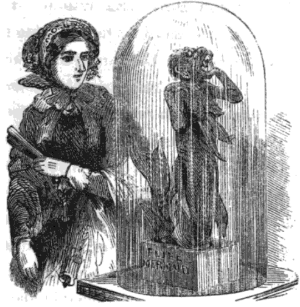
FeeJee Mermaid in 5 Days, Prop Build Project Day 3
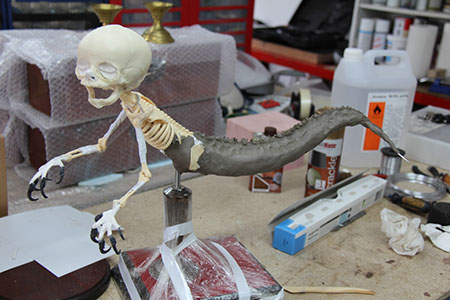
We’re almost at the halfway mark and it’s time to finally give our mermaid some character by adding the skin and creating a face.

A matt black acrylic undercoat was applied to the whole mermaid.

To add some 'skin' to the bones I used a pair of tights.

I cut one leg off and then removed the foot section. The foot section was used for the head while the remaining tube section of the leg was used for the body.


The tights were then stretched over the skeleton and tail and secured with elastic bands, these sections will be removed and cut away later. The whole mermaid was then given another coat of liquid latex, this will secure the ‘skin’ to the bones and tighten slightly to reveal the bone structure underneath.

To accelerate the drying process a number of hot air blowers where arranged around the mermaid.

I then wanted to create a fish scale texturizer for the final skin layer. I rolled a piece of polymer clay and created a fish scale pattern with a sculpting tool.


I then covered the clay with a thick layer of plaster and once this was dry I covered the plaster in another layer of plaster coated crepe bandage to create a hard shell.

Once the plaster was dry I removed the polymer master and poured a thin layer of silicone rubber into the plaster mould. This will give me a flexible scale texturizer that I will use over the whole tail section during the next stage.


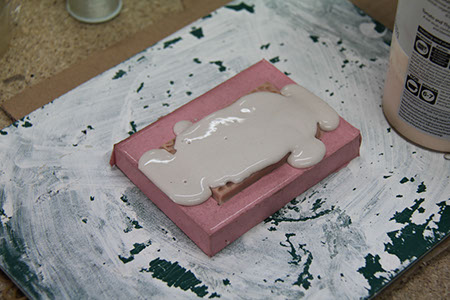
Once the latex skin was dry I could apply the spines and work on the face by applying teeth and modelling the eyes.
Using a scalpel I cut slits for the eyes, nose and mouth and rolled back the rubberised tights to create lips and eyelids.

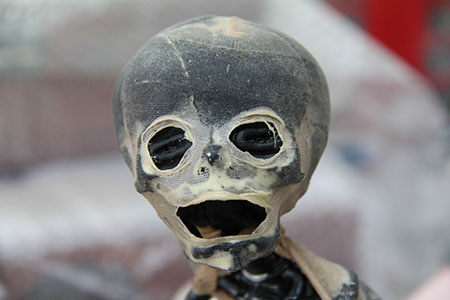
The teeth were created by taking real fossilized shark’s teeth and splitting them with pliers to make sharp shards.


To insert the teeth I simply lifted the lips and placed the teeth behind the skin with a dab of superglue to secure.


The spines were positioned with a hot glue gun and then coated around the base with latex to strengthen the join.


I’ve left the mermaid to dry over night as tomorrow I will apply the material that will give the mummified effect.
FeeJee Mermaid in 5 Days, Prop Build Project Day 2

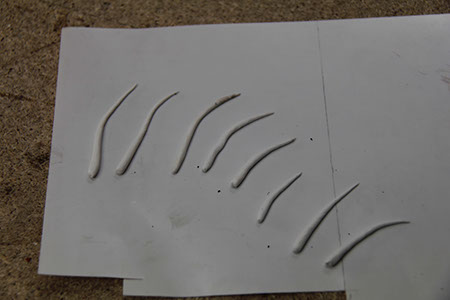
As expected, I woke up to discover that the air dry clay was still slightly damp however, it will be fully dry by the afternoon. For the morning task I thought I would make the fins and spines so that they are ready to fit at a later stage.
I decided to scrap the Milliput spines I made yesterday as although dry they were still pliable and bendy. I decide to use polymer clay and then paint them with bone coloured acrylic spray (Army Painter Primer)


The fish fins are made from baking parchment and are very realistic once complete.

Just cut a large piece of baking parchment, lay it flat on a table and spray both sides with Rust Dirty Down Special Effects Dye. The first pass should be uniform and even.


Then create spots on the paper by spraying a few millimeters away from the surface of the paper, the aim is to create spots of dye saturation in a random pattern.
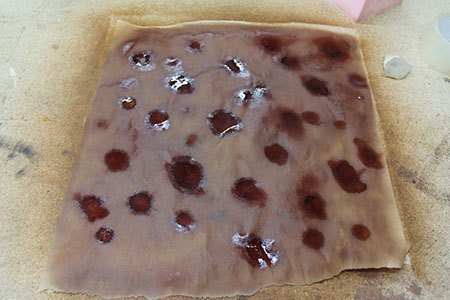

Then let the paper dry.
Finally, cut the fin shape and fold repeatedly to create a fan. Then fray the fin tips with scissors. I’ve decided to go to town on the fins and create a head crest and fin ears but you'll see these when they are fitted later.


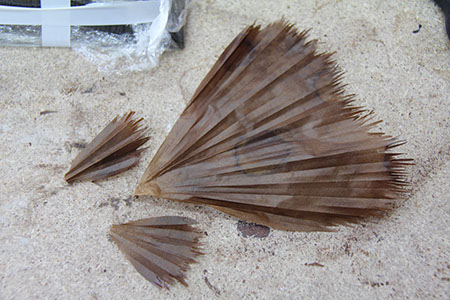
Once the fins are fitted to the mermaid they will be given a coat of gloss canvas varnish. This will make them translucent and enhance the colour making them even more realistic.
After lunch the weather warmed up so the air dry clay finally dried! You can see, as a result of rapid drying large cracks appeared -

To hold the clay together and fill the gaps I gave it a couple of good coats of liquid latex to act as a skin.

I’ve also decided to go with the classic FeeJee Mermaid pose and set the limbs into position with tape, a hot glue gun and epoxy putty.

With all the major foundation work complete we can start to bulk out the body, apply the skin and textures.
FeeJee Mermaid in 5 Days, Prop Build Project Day 1
This 5 day tutorial was originally released on the blog of one of my previous business ventures 'Pyewackette and Pecke'. It was a dark cousin of Etsy, a site dedicated to hunting down the best alternative artists and collectors and providing them with a platform to showcase their dark talents and products. The project folded due to high demand for my own personal work so rather than spread myself too thinly I decided to focus my creative efforts here.
I have received a huge amount of e-mails requesting the tutorial to be republished so here it is. Enjoy me hearties arrrgh!
Unlike other artists I know, I work best under pressure and within time constraints however, I’ve not left this project to the last minute by choice. It’s been so busy here at Pyewackett HQ that I’ve merely lost track of the hours, days and weeks and possibly even the year! Anyway, next Saturday is the Alternative Market in Derby hosted by Curiouser & Curiouser and I was planning a nice big centre piece for my display, namely a FeeJee Mermaid. One thing has led to another and as you may have guessed I’ve not even started so I had an idea...
Over the next few days I will be posting a daily blog on the build of the mermaid. It needs to be complete and ready to ship to Derby on Friday so it’s going to be tight! I’ve made many bizarre props and creatures over the years but never a FeeJee Mermaid so I will be pulling together a whole host of building methods, techniques and idea I’ve never realised to hopefully create something worth displaying this coming Saturday.
Not enough people in the prop building community share their ideas which is a shame. Some people guard their techniques like Smaug sat on his hoard of Dwarven gold. If we don’t share then our precious methods die with us. As Adam Savage mentioned at MakerFaire 2014 – no secrets!
In his own wise words -
"nobody is going to take your technique and then steal your ideas, nobody has a monopoly on being you and if you think that your technique is what makes you interesting you’re being ridiculous, so share your techniques! When you share an idea, somebody may come back to you with a better way of doing it and you’re going to learn something from them and develop your own techniques even further."
So, I’m going to cover what I do right here. If you want to try it for yourself and go for it, if you know a better way of doing something let me know! Either way sharing, experimenting and learning is what prop building is all about, so through my blogs and workshops I hope to promote that way of thinking.
Right, let’s get to it…
Here's what I've achieved at the end of day 1. We'll then look at what I did to get this far and any challenges faced....
I wanted my mermaid to be true to the original size which is about half a metre in length, I also had to consider mounting options at I did not have a display case or dome in stock.
The mermaid is built around an 18” medical skeleton model, a resin cast of a human infant skull and tail made from armature wire, tin foil and air dry clay.
Hands
In the past I have had to source real magpie or crow feet to obtain claws for fingers. Thankfully I can now just 3D print a bird’s foot, claws n’all without harming a single creature. I use the Up Plus 2 printer and using black ABS filament I printed 4 sets of Osprey feet. To get the shiny claw finish I brushed each foot with pure acetone. This also smooths out any imperfections and bumps let over from the printing process.

Each printed toe and claw was then snipped and attached to a wire hand armature. As mentioned before, I like to make the skeletons of the creatures I make fully poseable so that I can mess with the dynamic posing before any other materials are applied.

The hand shape was filled out with white Milliput and the original skeleton hand was replaced with the new larger clawed mermaid hand.

Skeleton
As I discovered from my mummified fairy hoax, then best way to replicate a corpse if to use a realistic skeleton to drape you skin over. Don’t bother making your own, just an ‘off the shelf’ school biology model will do. You just need to make it poseable. I just deconstruct the skeleton, removing all screws etc and rearticulate it with armature wire and tape. To bend the spine into position I just heat it with a heat gun, bend to the desired position and then immerse in cold water to set it.

The signature feature on a FeeJee Mermaid is the oversized freaky head. I removed the standard skull from the skeleton and cast an infant skull in resin. I then modelled a nose and closed eyes with Milliput. The ears will go on later.

After a lower jaw section was cast and attached, the head was then screwed to the articulated skeleton. The upper torso is now starting to take shape and the over sized head and hands already give the FeeJee mermaid that signature look.

Tail
I’ve never tackled a fish tail before (excuse the pun) so this was new territory for me. To gauge the desired length I cut a large piece or armature wire, twisted one end around the pelvis of the skeleton and then cut to what looked like the right length for a mermaid’s tail.


With the remaining Milliput left over from the hands and face I rolled a number of spines that I will use later to model a dorsal fin.
A rough tail shape was then modeled with tin foil wrapped around the wire. Tin foil was also packed into the rib cage cavity and and abdominal area to give additional strength and to act as a key for later applications of modeling material to grip to.

Base
At this stage I needed a base. This would allow me to handle the mermaid safely, dynamically pose the skeleton and allow it to dry without any contact with surfaces which may crumple or alter the position.
The studio is full of remnants of old projects and bits that I keep in hope they may come in handy one day. I had a nice large and heavy diorama base from an aborted Golden Demon Awards project so I roughed it up on the belt sander and gave it a quick dusting with 2-part crackle paint. A red velvet baize was then fitted.
To mount the mermaid I took an antique wooden candle stick and dismantled it. I then drilled a hole in the plinth and screwed the candle stick to it.

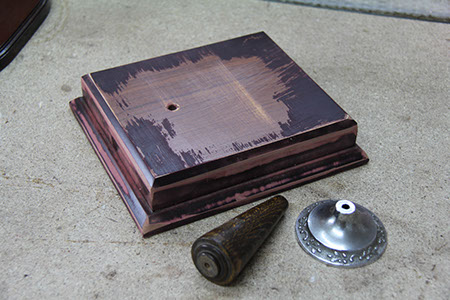
A steel rod was fitted into the rib cage of the mermaid and a hole was drilled into the top of the candle stick allowing the mermaid to be mounted securely but also removable.


Tail Part 2
Once the mermaid was securely mounted I could continue modelling the tail. This was done with air dry clay, not everyone’s favourite material but it allows me to sculpt what I want quickly. It does crack when it dries however, I will cover what I do to get around this on Wednesday when it will hopefully be dry.


I continued the vertebrae from the upper torso and down the fish tail and added some rough texture. Most of this will be covered over the next few days with layers of latex and plaster so a neat finish is not important.
As you can see from the image above, the base has been wrapped and taped to protect over the coming days.
The main aim of today was to complete the foundations of the mermaid figure and get it mounted. I'm hoping the clay will dry by Wednesday morning at the latest although I have bought the mermaid into the house in the hope of speeding up the drying process. Depending on how she does over night will dictate what I cover tomorrow!
The Krampus Returns Part II
I've had an usually creative week to the point where I feel the true spirit of the Krampus has taken hold of my hands and finished the job subconsciously!

Gruss Vom Krampus!
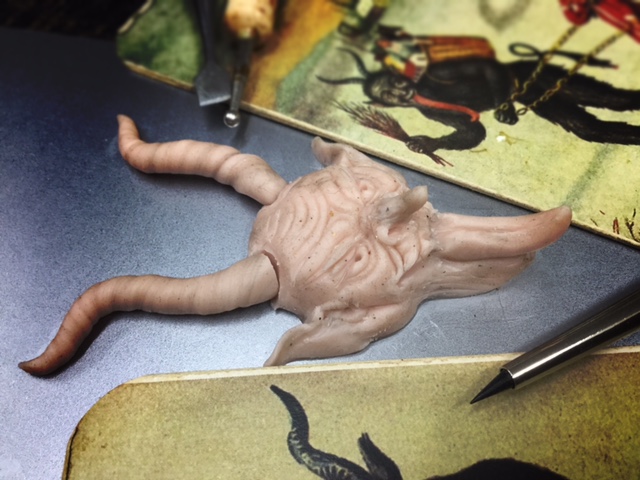
Since the last post I completed the sculpey master, created a mould and successfully cast and painted the first Krampus head. As the horns are delicate I decided to make a 3 part casting (1x head and 2x horns) and it all came out rather nicely. I'm also going to make a copper cast of the Krampus to allow for a few options on the final pieces.
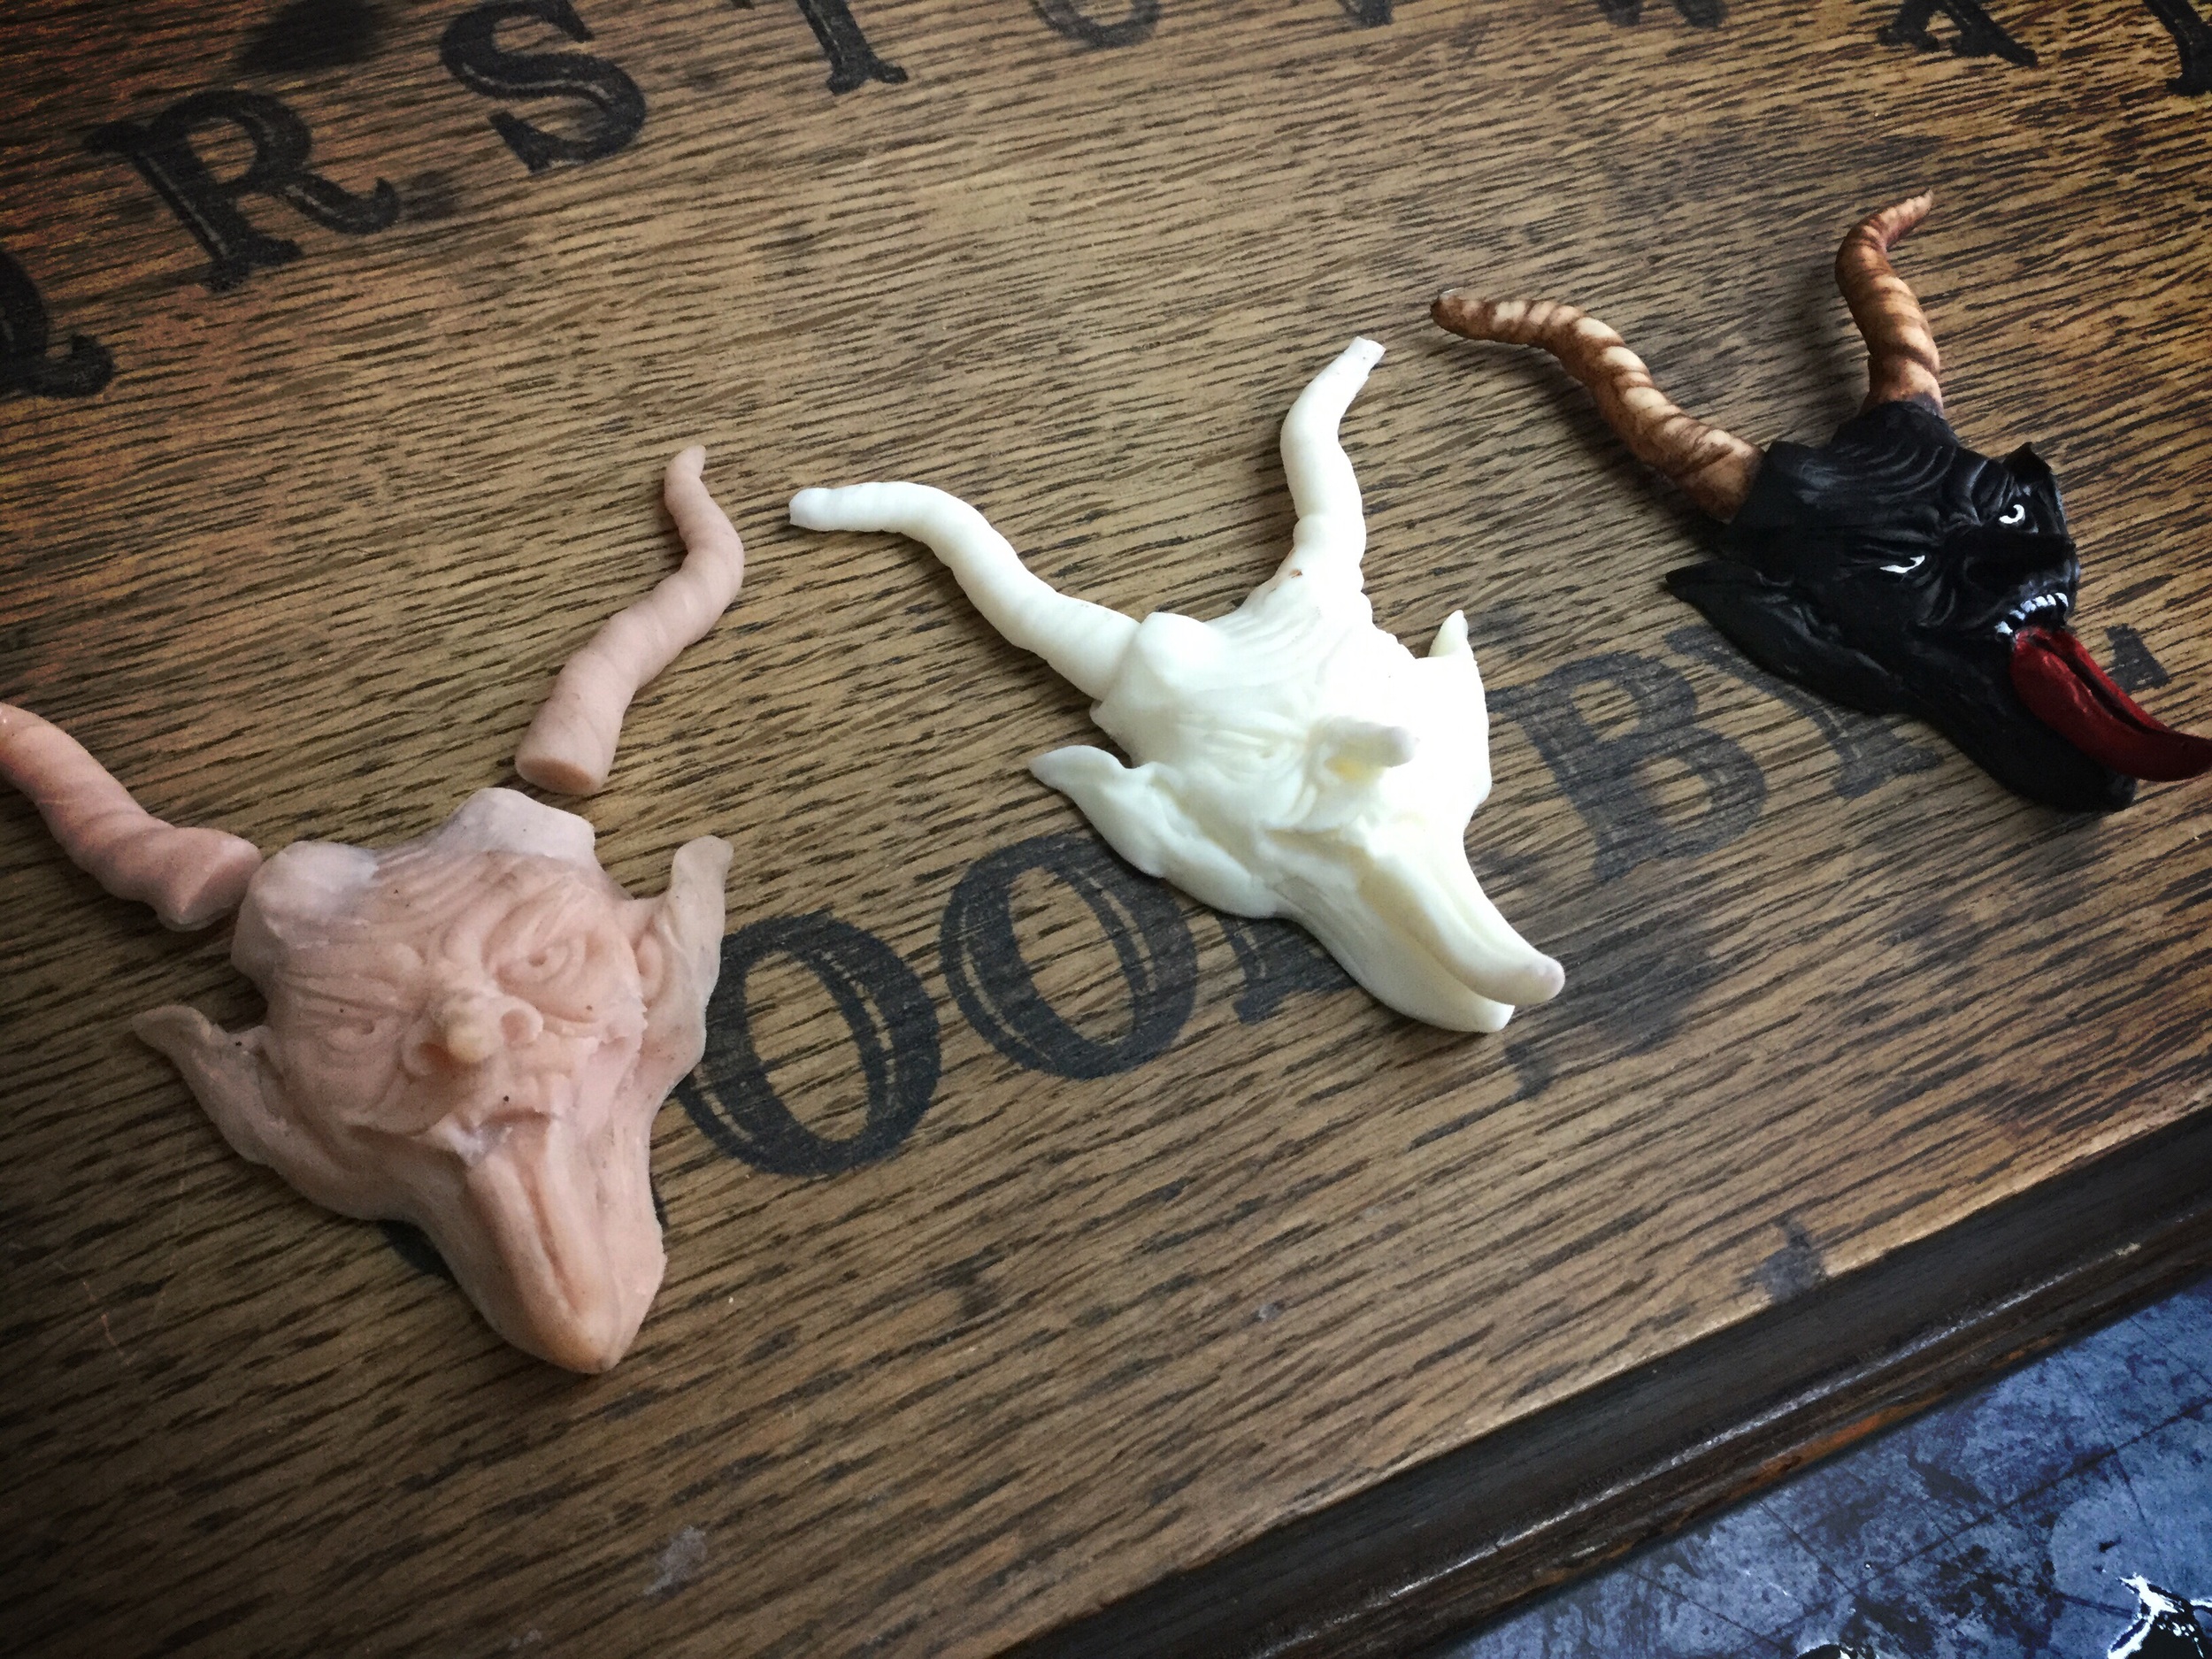
Master sculpt, resin cast and painted final
The wallet has been designed to accommodate the full Krampusnacht box as this has enough room for the additional routine photos that will come with the wallet. When it came to the colour there was only really one option, blood red! Once dry is was buffed and dirtied to give it an aged look.
The Krampus head is mounted on a 3D printed snowflake to retain the festive feel and to give me something more durable than resin as a backing piece.

Each of the wallets will be numbered and limited to 100 to compliment the original print run of the cards. An additional photo card will also be included in the package showing a group school photo to illustrate a cautionary tale of school bullies and the dire consequences, especially around Christmas....

The next stage is to cast the bronze version and also look at some real fur trim to give the Krampus his signature beastial look.

The stud fastener may also be replaced with a more ornate version. In the meantime I may knock myself up a Krampus tree ornament or transfer his face onto an 'Elf on the Shelf' to create the more terrifying 'Devil on the Level'!

Embossed back
The Krampus Returns...
Since the huge success of Krampusnacht over Christmas I have received numerous e-mails from customers requesting something befitting to store their cards in. Although the red box I supplied was perfectly adequate there has been a demand for demonic bling, a satanic sheath that will protect your Krampus cards from do-gooders until next Christmas.
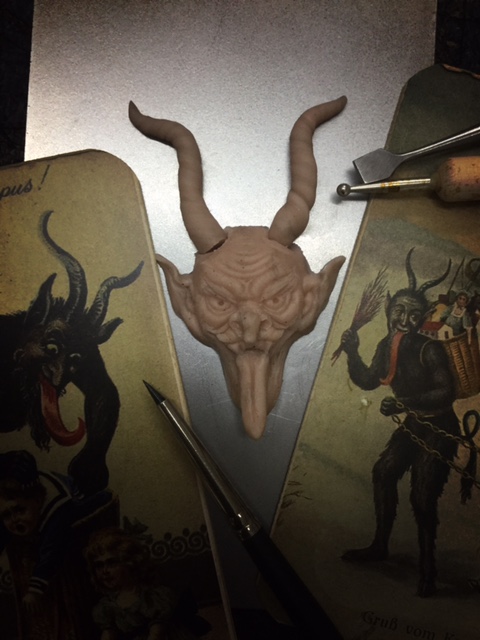
I originally started to create a leather embossing plate of the Krampus but I wanted something with greater visual impact that would compliment the cards. I grabbed some sculpey from the studio shelf, cranked up some Bauhaus and 2 hours later I ended up with a face I definitely recognised.
The idea is to create a leather wallet which will be embossed with 'Krampusnacht' and possibly more devilry on the back but the front will be graced with a cast Krampus head plaque. I'm going to experiment with finishes but expect at least two which will be bronze cast and traditional hand painted with real fur trim.
After a few hours of losing myself in sculpting the face I've got the sudden desire to complete the head and possibly even create a bust. Watch this space...
Studio equipment I couldn't live without - Part 1
18 months ago my wife pulled out all the stops for my 39th birthday and bought me a 3D printer. Our trip to Boston a few months earlier saw us wander into a Makerbot store to escape the cold and from that point I knew I wanted one. When you first own a 3D printer it's akin to winning a large sum of money, what do you buy first or rather what do you print first? The options are quite overwhelming.
My previous tools had been more traditional. If I wanted to build a steampunk clockwork mechanism I would have to source the components or cast new parts in resin. If I needed an enclosure for a circuit I would have to trawl the Internet for a supplier of the nearest size which would undoubtedly be too large or a fraction too small. The 3D printer solved these issues for me but it wasn't love at first sight. I was shocked to discover that good 3D printing, in its current form at least, takes some degree of skill and knowledge to get it right.
Initially I had no idea what to print, nothing of any use anyway. The obligatory bunny rabbit, Lego blocks for the kids and other random trinkets flooded from the studio. Only one in three prints were what I would consider good. The others had warped, misprinted of just ended up as a huge tangle of melted filament. I had to teach myself everything from scratch and by learning the hard way you tend to learn the best way.
My wife did her research well and I ended up with the Up Plus 2 printer from Printme 3D in London. It's a great machine and I can get a perfect print from it 99% of the time but in order to get this far I've got through hundreds of meters of ABS and hours of wasted machine time. I'll share a few tips with you that I've picked up along the way that might help you finally get that perfect print.
Enclosure
The Up printer has no enclosure and this is a big issue when you work in a cold drafty studio. Due to temperature fluctuations and breezes from the opening and closing of doors I found that prints lifted and warped. To solve this I purchased a huge 50 liter container made by Really Useful Boxes, made a level stand and flipped the box on its side. I drilled a couple of holes for the USB and power cables and made a new home for my printer. This provides a stable environment isolated from external forces that can disturb the printing process. The boxes are really heavy duty and also make a great platform for my laptop which controls the printer.
The interior of the enclosure is not 100% level so to rectify this I purchased a large chopping board from Ikea and installed this using a spirit level before placing the printer inside. There was also enough surplus space to add a filament roller with bearings which I also printed.
Most of my printing is done at night so I installed some led light strips to illuminate the work area while the rest of the studio lighting can be switched off. The eerie green glow not only pimps your printer but serves a purpose in low light.

Printing Plate
I just couldn't get on with the supplied perf board printing plates that came with the Up. After trying lots of alternatives the best solution I have found was to make my own from 1mm steel sheet. For about £15 you can get about 10 or more plates cut to fit your print bed perfectly. I then cover the plate in blue tape and get a perfect print with no lift every time. You may want to experiment as the metal plate is much heavier than a traditional perf board but the Up does not struggle with the additional weight. You could use aluminum but this bends easily and a slight kink in the metal will throw your nozzle height out.
I always print with no raft and minimal support where possible and heat the platform to 100 degrees C before each print run.
Levelling
This took me a while to figure out correctly. The Up has an auto calibration facility for level and nozzle height which is temperamental to say the least. After a couple of replacement calibration modules and no significant increase in reliability I decided to calibrate it manually. It was the best move I ever made. It took a day of tinkering and finding the right way to gauge nozzle height and get an eye for a level platform but it paid off. Give me 5 minutes and a folded piece of paper and I'll give you a perfectly level platform.
Heating
To get my print plate to the right temperature quickly I place my thick leather cutting gloves on the platform to insulate it. I also extrude just before I hit print so that the nozzle is already nice and hot and the first 'nose wipe' sticks well.
Printing Tips
Prints with large surface areas and corners such as boxes are prone to lifting. To minimize this I always rotate my object so that the smallest surface area is on the print bed. So instead of printing a playing card box for example laying flat I would rotate it so that only the shortest edge is on the print bed.
If you get a misprint look at why it misprinted. A visual inspection will probably tell you what went wrong so that you can rectify it before your next print run.
If you use blue tape make sure you replace it after every print. If it becomes tough to remove just heat your plate up to 90 degrees and it'll peel away very easily.
Once you've calibrated your platform level and nozzle height make sure that your print plate goes back the same way if you remove it. I clip the corner of my plates so they always go back exactly the same way they came out. The clipped corner gives me a visual orientation guide.
If I need a part for a prop, instead of jumping on the Internet and searching in vein I just take 5 minutes and think to myself "can I print that part?". 75% of the time I've either found the part I need on Thingiverse or I've created my own in Sketchup. I'm also in the process of mastering Blender which can export .stl files.
Nearly every prop I've made in the last 12 months has a 3D printed element that normally would've taken lots of time and money to source. It's the one piece of kit in the studio that gets turned on first thing in the morning and off last thing in the evening. So thanks to my wife she has revolutionized the way I work and if I had the studio space I'd have a whole array churning out parts day and night. My gifts to her on the other hand are not quite as spectacular and she's still not forgiven me for the steam mop I gave her for Christmas.