
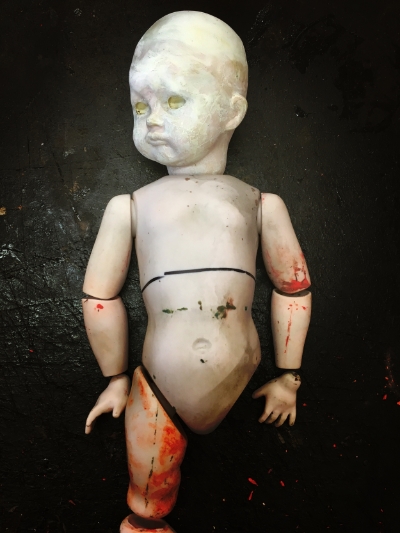
Guys & Dolls Part 3 - Head like a Hole
After some tinkering in MeshMixer the first Dolly Darko head 3D print was faultless. As the print is completely hollow the print time was less than an hour which opens the possibility of printing a full doll in a single day.
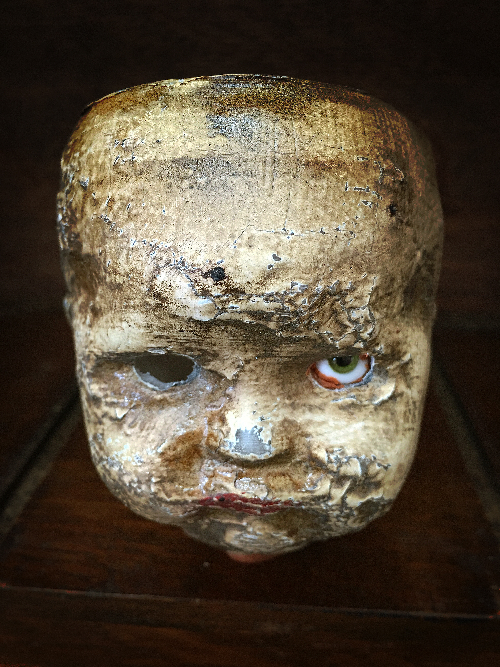
The print is also extremely light with the fully painted head weighing in at only 24 grams which means a complete doll should weigh around 200 grams fully clothed. For people worried about the weight and feel of the doll, you'd be surprised it was made of plastic as the material once painted feels more like traditional paper mache. In no way does it feel or look like it was made using cutting edge technology.

The paint finish on the head is slightly over the top but I wanted to see how battered and nasty I could make her. A more toned down, cared for antique look will also be available to the more faint hearted.
The printer is currently churning out the torso so a full doll might feature in next weeks blog.


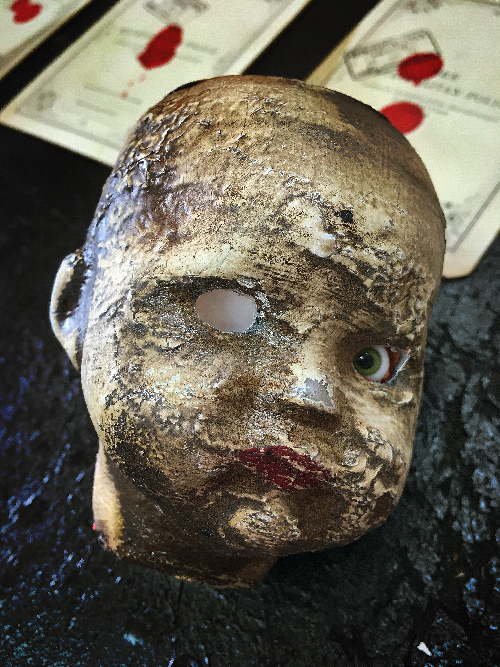
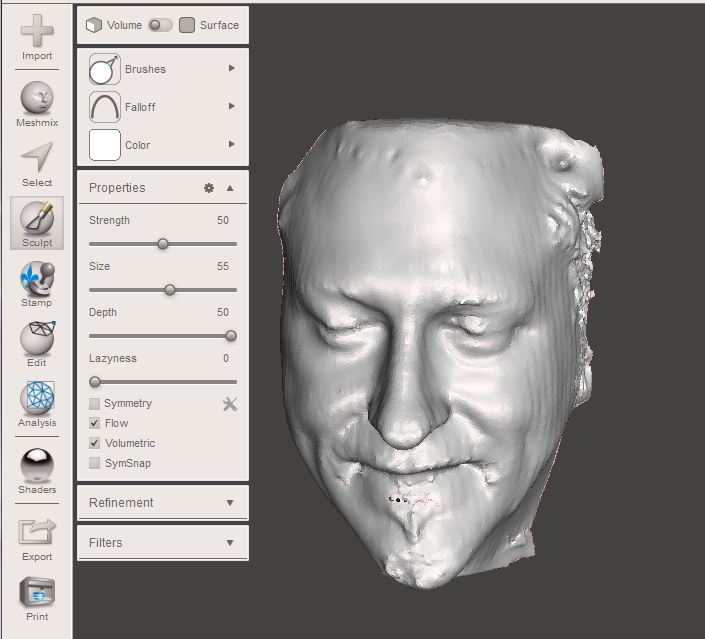
Guys & Dolls Part 2 – Dolly Darko goes digital
Dolly Darko has come a long way since I discovered her dusty body in a Parisian antique shop over a decade ago. She's been entombed in silicone and cracked and dropped so many times the original bisque doll is a sorry sight. The moulds used to create the forty or so Dolly Darko dolls are also on their last legs and have begun to fall apart.
In an attempt to immortalise Dolly in the digital realm I have started the task of 3D scanning all of the parts. Not only will this allow me to reproduce Dolly once again without the need of casting and moulding equipment but I will also be able to digitally restore any damage thus making her perfect once again. At some point in the past her right thigh was totally destroyed however, through 3D scanning I've been able to scan the left thigh and mirror it via the software editor to make a brand new right thigh.

Once all of the components are scanned and saved I can print Dolly in any size and colour but more importantly, I can print her with a hollow torso and head. This gives me the opportunity to install servos and other gadgetry that will make Dolly even scarier than her resin counterpart. It will also make her 80% lighter than the original which introduces the possibility of puppetry. A doll version of Losander's floating table anyone? By implementing this amazing new technology it is all possible, although the journey to get this far has been one hell of a steep learning curve!
As well as capturing Dolly Darko digitally I have also started to capture all of my other existing antique doll and vent doll heads for future projects. Even if one should become lost or damaged I'm only a few hours of printing away from a new one. It's a facility that will become invaluable in the studio and I'll never have to endure my collectibles to the rigours of silicone and latex ever again. As strange as it sounds, the ability to scan and reproduce any object leaves you with an almost god like feeling!

Next time I will compare a few test prints with the original parts of Dolly Darko in terms of detail and weight. It finally looks like Dolly Darko MkII could be a chilling reality, only this time she'll be much scarier than before...
Guys & Dolls Part 1 – Vent Yourself

After a few years of successful 3D printing the next logical progression was to purchase a 3D scanner. I had been monitoring the market for a while but nothing was available that fitted my criteria at a reasonable price, that was until the Einscan-S came along. This scanner adopts structure white light scanning technology, which features faster scanning speed (3 minutes /circle, much faster than similar desktop 3d scanners), lower noise, better details (accuracy ≤0.1mm) and safer for eyes compared to laser scanning technology. What does this mean to the non-techie? It means I can scan a human face, manipulate and print it at any size. So like me, if you're in the business of making creepy dolls this type of tool creates endless possibilities.

Taking inspiration from Evelyn Poole's collection of voodoo ventriloquist dolls from Penny Dreadful Season 2 I have started a mini project to 'vent' myself. There's something very peculiar about holding an exact copy of your own face in the palm of your hand. The process is quick and significantly less messy than entombing someones head in alginate and creating casts with buckets of plaster. The first scan was printed in white ABS and once the eyes were added my face came alive. Followers on Facebook will have seen me attaching my 'mini me' to various dolls with truly disturbing results.


When you invest money into a piece of kit like this the first thing that crosses your mind from a business perspective if how you're going to recoup that money. Having only played with my new toy for 2 weeks I can see that 3D scanning and printing will become the workhorse of the studio and my mind is overflowing with ideas and possibilities. Personalised ventriloquist dolls are just a start and I already have people lining up to donate their faces and be immortalised in plastic. I'm one step closer to my Braavos 'Temple of Many Faces'. Valar morghulis!
Next week work begins on Dolly Darko MkII...
Designing the Doomsday Hex Factor Trophy
For the second year running I will be organsing Doomsday VII. This is the UK's top bizarre magic convention which takes place in May at Sneaton Castle in the iconic gothic seaside town of Whitby.
Every year I get numerous e-mails from people wishing to perform who either don't have enough material for a full show, want to try something new or have literally never been on stage in their life. So this year I have decided to replace the evening gala show with The Hex Factor! Each performer is given a 5-10 minute slot in which to display their magic routines, disturbing talents or anything you feel suitable for the Doomsday audience. A panel of judges will give feedback but ultimately the audience will decide the best act of the evening.
The winner will be awarded a full performance spot at Doomsday 8 and a pair of free tickets but more importantly they will win the The Hex Factor trophy! To dangle the carrot for potential entrants I thought I would get the creative wheels in motion and design the trophy.

Nothing screams occult more than a skull on a stick, especially one adorned with inverted pentagrams and glowing red eyes! I wanted the trophy to be more than your typical golden cup with a marble base. I wanted to create something that if you had it on your shelf at home it would genuinely worry visitors. What the hell did you have to do to win such a monstrosity? Satanist of the year 2016?!

The horns are 3D printed in translucent ABS. These were originally part of a Maleficent headdress but I removed the skull cap section and just printed the horns on a slightly smaller scale. The plaque on the reverse is also printed in black and translucent ABS. All that was required for the demonic red glow was a set of silver micro-string LEDs positioned in such a way to give the illusion of red pupils and a back light for the pentagram.

If you're thinking of entering the Hex Factor then you're currently in with a one in seven chance of winning the trophy. I'm going to cap the entries at 8 people so that we can have two 40 minute sections, an interval and guest performance from Brian Maxwell. So I need two more volunteers to sell their souls and be potentially ripped apart by the Doomsday dogs. However, you could walk away with the Hex Factor trophy! I can't promise you a million dollar contract and a pad in Malibu but what I can promise you is a glowing sheep skull impaled on a metal pole – I know what I'd sooner have!


The Krampus Returns Part II
I've had an usually creative week to the point where I feel the true spirit of the Krampus has taken hold of my hands and finished the job subconsciously!

Gruss Vom Krampus!
Since the last post I completed the sculpey master, created a mould and successfully cast and painted the first Krampus head. As the horns are delicate I decided to make a 3 part casting (1x head and 2x horns) and it all came out rather nicely. I'm also going to make a copper cast of the Krampus to allow for a few options on the final pieces.
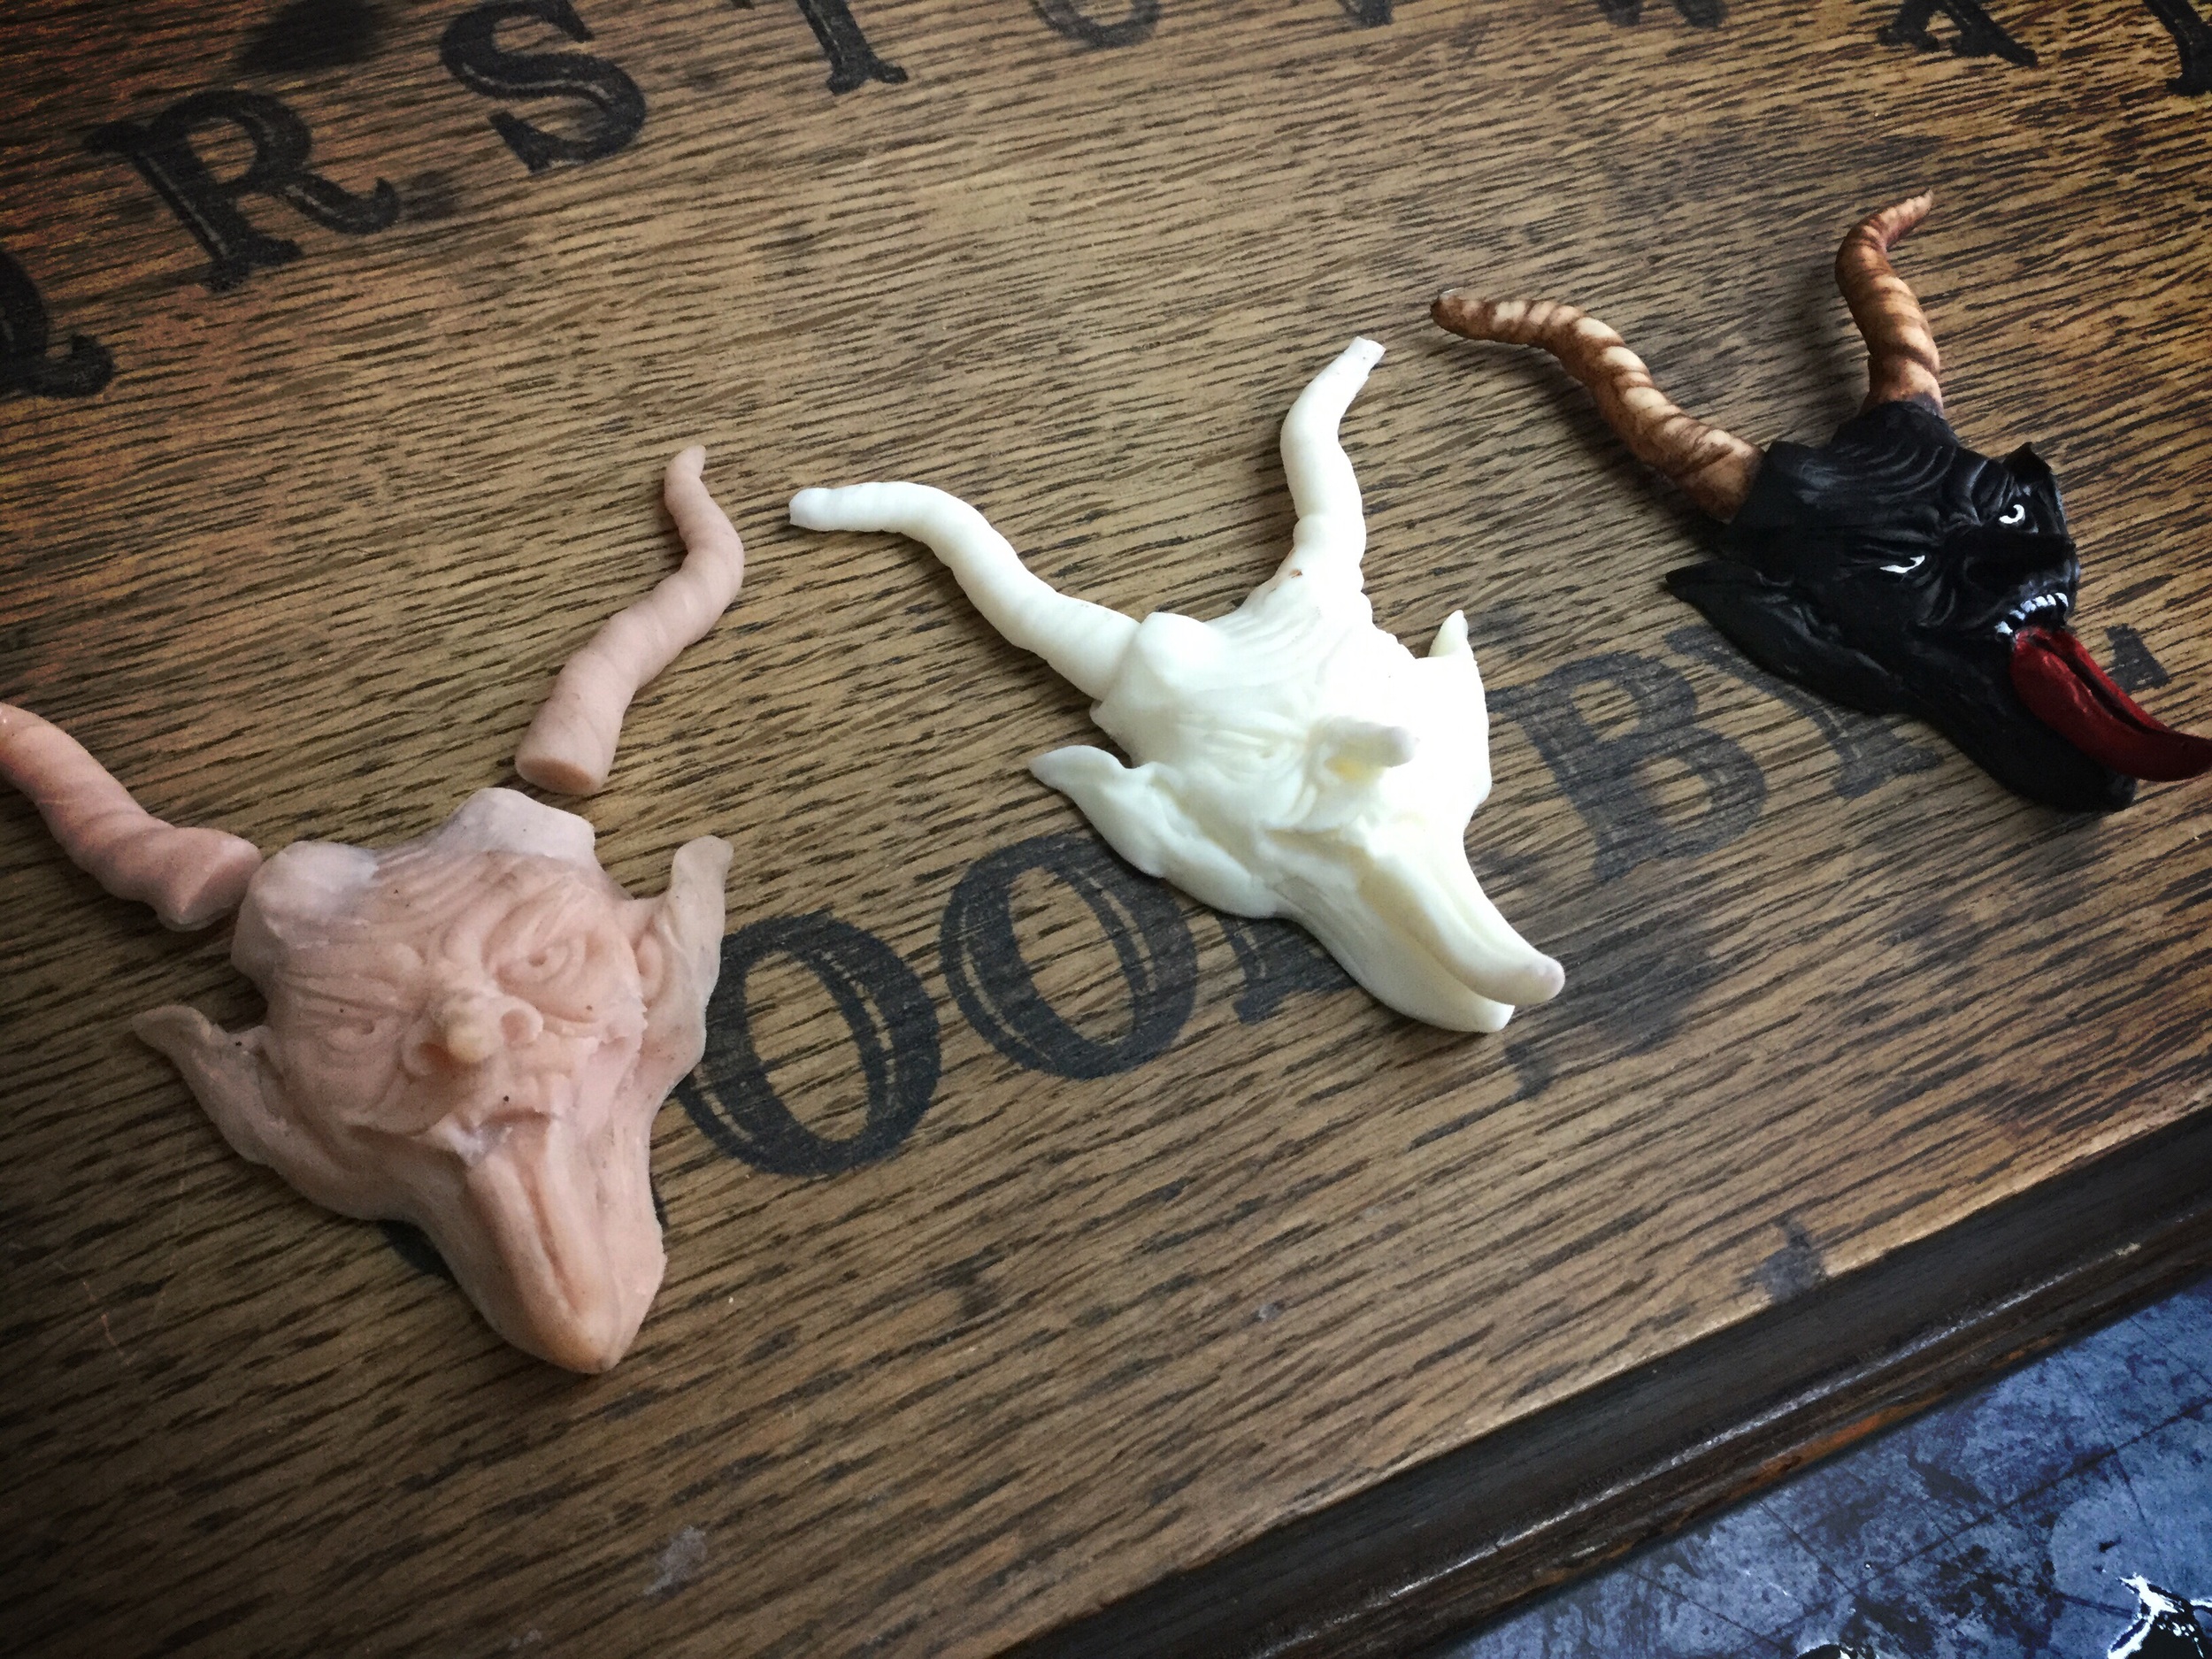
Master sculpt, resin cast and painted final
The wallet has been designed to accommodate the full Krampusnacht box as this has enough room for the additional routine photos that will come with the wallet. When it came to the colour there was only really one option, blood red! Once dry is was buffed and dirtied to give it an aged look.
The Krampus head is mounted on a 3D printed snowflake to retain the festive feel and to give me something more durable than resin as a backing piece.

Each of the wallets will be numbered and limited to 100 to compliment the original print run of the cards. An additional photo card will also be included in the package showing a group school photo to illustrate a cautionary tale of school bullies and the dire consequences, especially around Christmas....

The next stage is to cast the bronze version and also look at some real fur trim to give the Krampus his signature beastial look.

The stud fastener may also be replaced with a more ornate version. In the meantime I may knock myself up a Krampus tree ornament or transfer his face onto an 'Elf on the Shelf' to create the more terrifying 'Devil on the Level'!

Embossed back
Studio equipment I couldn't live without - Part 1
18 months ago my wife pulled out all the stops for my 39th birthday and bought me a 3D printer. Our trip to Boston a few months earlier saw us wander into a Makerbot store to escape the cold and from that point I knew I wanted one. When you first own a 3D printer it's akin to winning a large sum of money, what do you buy first or rather what do you print first? The options are quite overwhelming.
My previous tools had been more traditional. If I wanted to build a steampunk clockwork mechanism I would have to source the components or cast new parts in resin. If I needed an enclosure for a circuit I would have to trawl the Internet for a supplier of the nearest size which would undoubtedly be too large or a fraction too small. The 3D printer solved these issues for me but it wasn't love at first sight. I was shocked to discover that good 3D printing, in its current form at least, takes some degree of skill and knowledge to get it right.
Initially I had no idea what to print, nothing of any use anyway. The obligatory bunny rabbit, Lego blocks for the kids and other random trinkets flooded from the studio. Only one in three prints were what I would consider good. The others had warped, misprinted of just ended up as a huge tangle of melted filament. I had to teach myself everything from scratch and by learning the hard way you tend to learn the best way.
My wife did her research well and I ended up with the Up Plus 2 printer from Printme 3D in London. It's a great machine and I can get a perfect print from it 99% of the time but in order to get this far I've got through hundreds of meters of ABS and hours of wasted machine time. I'll share a few tips with you that I've picked up along the way that might help you finally get that perfect print.
Enclosure
The Up printer has no enclosure and this is a big issue when you work in a cold drafty studio. Due to temperature fluctuations and breezes from the opening and closing of doors I found that prints lifted and warped. To solve this I purchased a huge 50 liter container made by Really Useful Boxes, made a level stand and flipped the box on its side. I drilled a couple of holes for the USB and power cables and made a new home for my printer. This provides a stable environment isolated from external forces that can disturb the printing process. The boxes are really heavy duty and also make a great platform for my laptop which controls the printer.
The interior of the enclosure is not 100% level so to rectify this I purchased a large chopping board from Ikea and installed this using a spirit level before placing the printer inside. There was also enough surplus space to add a filament roller with bearings which I also printed.
Most of my printing is done at night so I installed some led light strips to illuminate the work area while the rest of the studio lighting can be switched off. The eerie green glow not only pimps your printer but serves a purpose in low light.

Printing Plate
I just couldn't get on with the supplied perf board printing plates that came with the Up. After trying lots of alternatives the best solution I have found was to make my own from 1mm steel sheet. For about £15 you can get about 10 or more plates cut to fit your print bed perfectly. I then cover the plate in blue tape and get a perfect print with no lift every time. You may want to experiment as the metal plate is much heavier than a traditional perf board but the Up does not struggle with the additional weight. You could use aluminum but this bends easily and a slight kink in the metal will throw your nozzle height out.
I always print with no raft and minimal support where possible and heat the platform to 100 degrees C before each print run.
Levelling
This took me a while to figure out correctly. The Up has an auto calibration facility for level and nozzle height which is temperamental to say the least. After a couple of replacement calibration modules and no significant increase in reliability I decided to calibrate it manually. It was the best move I ever made. It took a day of tinkering and finding the right way to gauge nozzle height and get an eye for a level platform but it paid off. Give me 5 minutes and a folded piece of paper and I'll give you a perfectly level platform.
Heating
To get my print plate to the right temperature quickly I place my thick leather cutting gloves on the platform to insulate it. I also extrude just before I hit print so that the nozzle is already nice and hot and the first 'nose wipe' sticks well.
Printing Tips
Prints with large surface areas and corners such as boxes are prone to lifting. To minimize this I always rotate my object so that the smallest surface area is on the print bed. So instead of printing a playing card box for example laying flat I would rotate it so that only the shortest edge is on the print bed.
If you get a misprint look at why it misprinted. A visual inspection will probably tell you what went wrong so that you can rectify it before your next print run.
If you use blue tape make sure you replace it after every print. If it becomes tough to remove just heat your plate up to 90 degrees and it'll peel away very easily.
Once you've calibrated your platform level and nozzle height make sure that your print plate goes back the same way if you remove it. I clip the corner of my plates so they always go back exactly the same way they came out. The clipped corner gives me a visual orientation guide.
If I need a part for a prop, instead of jumping on the Internet and searching in vein I just take 5 minutes and think to myself "can I print that part?". 75% of the time I've either found the part I need on Thingiverse or I've created my own in Sketchup. I'm also in the process of mastering Blender which can export .stl files.
Nearly every prop I've made in the last 12 months has a 3D printed element that normally would've taken lots of time and money to source. It's the one piece of kit in the studio that gets turned on first thing in the morning and off last thing in the evening. So thanks to my wife she has revolutionized the way I work and if I had the studio space I'd have a whole array churning out parts day and night. My gifts to her on the other hand are not quite as spectacular and she's still not forgiven me for the steam mop I gave her for Christmas.